The principle for this operation is the same as with all basic mates: The stronger side must drive the opposing King to the side of the board-not necessarily a corner of the board. The checkmate can only be carried out with the combined efforts of both the King and the Rook. First let's start from the end and show the most basic winning situation.

Black King can't be mated in the middle, so chasing it to any edge is absolutely essential! White should move his King as close as possible to the Black King and only then should he use his Rook. Black should try to keep his King in the middle of the board, because it is impossible for White to checkmate him here. Consider the following starting position.
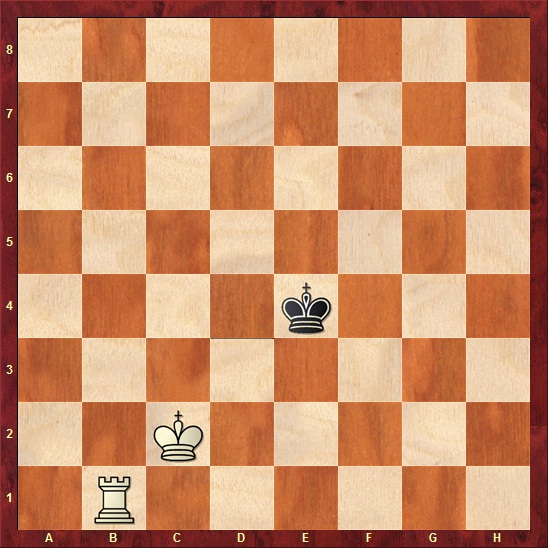
White to move

1.Kb2

1...Kd4
An inferior move is 1...Kc4, to which White would respond 2.Rd1!, trapping the Black King on the a-, b-, and c- files.

One method that works well is the "box" method, in which the opposing King is placed by the Rook in
a box that just gets smaller and smaller until the King is checkmated. Note how many squares Black King can move to. White plan will be to reduce the number of those squares. In this case, White playes
2.Kc2

2...Ke4
Once again, 2...Kc4 would have been met by 3.Rd1, and the Black King would have lost ground faster than necessary.
White continues pushing Black back with his King.
3.Kc3

Another possibility for Black is 3...Ke3, though this move would make White task somewhat easier. White would then begin boxing in Black King by setting up the sequence 4.Re1+ Kf2 5.Re4 Kf3 6.Kd3. Notice that Black King would then be confined by the Rook to the box of squares: f3-f1-h1-h3-f3.

4.Rd1 Ke4 5.Rd3
White sets up his first box. Black King is now confined to the e4-e8-h8-h4-e4 box. 
5...Kf4
Black isn't happy about 5...Ke5 6.Rd4 because he realizes the box would shrink.

The King has to come up the board and play a role in forcing the opposing King backward. 6.Kd4 Kf5 7.Re3 Kf4 does no good.

6...Kf5 7.Re3 Kf4 8.Kd4 White job is only made easier, as Black is quickly herded to the side of the board.

7...Kf5 8.Kc5 Ke6 9.Rd5 Black King has fewer squares to go to after this move.

8.Kc5 Ke5 when either Black King escapes box after 9.Rd5+ Ke4 or Black repeat move after 9.Rc4 Ke6 Rd4 10.Ke5

8...Ke7 9.Kc5 Ke6 10.Kc6 Ke7 11.Re5+ Kf6 (11...Kd8 12.Re6 Kc8 13.Re7 when Black King is trapped on the edge.) 12.Kd6


10...Kf6 11.Rd6+ (11.Re5 Kg6 12.Kf4 Kf6 13.Re4 Kg6 14.Re6+ is also 'ok' for White)
10...Ke7 11.Ke5 Kf7 12.Rd6

11...Ke7 12.Ke5 Kf7 13.Rc6 (Waiting move) 13...Ke7 (13...Kg7 14.Rf6) 14.Rc7+ Kd8 15.Kd6


14...Kh3 15.Kf4

16.Rg7 (Waiting move)

16...Kh3 17.Kf4
16...Kh5 17.Rh7#


No comments:
Post a Comment