Aug 8, 2021

Indian Stars 8

Professor Satish Dhawan was an Indian mathematician and aerospace engineer, widely regarded as the father of experimental fluid dynamics research in India. Professor Dhawan was one of the most eminent researchers in the field of turbulence and boundary layers, leading the successful and indigenous development of the Indian space programme. 


Indian Stars 7

Anju Bobby George is India first and only World Champion in the IAAF World Athletics Final. Anju Bobby George made history when she won the bronze medal in long jump at the 2003 World Championships in Athletics in Paris. With this achievement, she became the first Indian athlete ever to win a medal in a World Championships in Athletics.


Aug 4, 2021

Indian Stars 6

 Sanjeev Kapoor

Sanjeev Kapoor is a famous Indian celebrity chef, entrepreneur and television personality. Kapoor hosted the popular TV show Khana Khazana, the longest running show of its kind in Asia which was broadcast in 120 countries and in 2010 had more than 500 million viewers. He is also the first chef in the world to own a 24X7 food and lifestyle channel.


"क्या पक रहा हैं?"

Indian Stars 5

 Geet Sethi

Geet Siriram Sethi of India is a professional player of English billiards who dominated the sport throughout much of the 1990s. He is a six-time winner of the professional-level and a three-time winner of the amateur World Championships, and holder of two world records, in English billiards. He, along with Prakash Padukone, has co-founded Olympic Gold Quest, a Foundation for the Promotion of Sports in India.


Indian Stars 4

 Paresh Rawal

Paresh Rawal (born 30 May 1955) is an Indian actor, comedian and film producer known for his works notably in Hindi films. 


Indian Stars 3

 Viswanathan Anand is an Indian chess grandmaster and former world chess champion. He became the first grandmaster from India in 1988, and is one of the few players to have surpassed an Elo rating of 2800, a feat he first achieved in 2006. Anand is a five-time world chess champion. 


Indian Stars 2

Leander Paes and Mahesh Bhupathi

The first pair to reach the finals of all Grand Slams in a year in the Open era, winning French Open and Wimbledon as top seeds.


Indian Stars 1

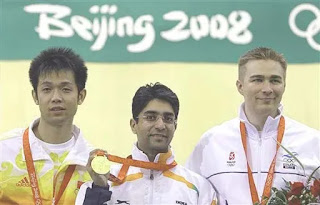
 In the list of people who made India proud, our first name is Shooter "Abhinav Bindra".

Abhinav Bindra is the lone Olympian who won gold for India in individual event till date. 


Jul 27, 2021

Basic Chess Ending 8 - Bishop and Kight

 Important principle to keep in mind in this ending are:

  1. The superior side must use all of his pieces, especially King, to create a "wall" as opposed to a box.
  2. The weaker King can be mated only in the corner of the same color as the Bishop i.e. the ones that can be attacked by Bishop.
  3. Try not to focus on checking the King and instead try to focus on surrounding the King, and limiting his moves.
  4. It is important to note that when playing a waiting move in this ending, you should NEVER use the Knight. Only play waiting moves with the King or Bishop.
  5. Technique of opposition is used to confine the weaker King.
The defender should try to stay in the center for as long as possible. Although defender can't do much about his King being forced back he can at least pick his corner. When forced, the weaker King should try to head for a wrong corner where mate can't be forced. This will then leave superior side with the tricky task of driving the weaker King along the edge of the board without letting it escape. 

At every stage of the ending the Knight is most effectively placed on the same colored squares as the bishop. This is because a Knight complements a light - squared Bishop efforts from a light square: only then can it control dark squares. 

Phase 1:
A quick glance at the starting position in diagram reveals that it is difficult to give specific guidance about this phase. 


1.Bg2
We will control the long diagonal of the triangle with our Bishop, and we will control the necessary dark squares using our Knight and King.


1...Kd4 2.Kd2
Maintaining the opposition.


2...Ke5 3.Ke3
2...Kc5 3.Kc3
2...Kc4 3.Nd3 Kd4 4.Ke2 Kc4 5.Ke3


3...Kf5 4.Nd3  This move simply brings the Knight into play and seals off the e5-square.
Again, Black doesn't want to be too cooperative by retreating before he has to. He will have to be driven to the h8-corner. 3...Kd6 4.Nd3


4...Kg5 5.Be4
4...Ke6 5.Be4


White pieces combine to cover a whole buffer of squares: f3, f4, f5, e5, d5, and more. White objective will be to press the wall forward, forcing Black into a corner.
5...Kf6
5...Kg4? 6.Kd4 Kg5 (6...Kg3 7.Ke5) 7.Ke5 King would be calmly shepherded over to the hl-corner to be mated.


6.Kd4
6.Kf4 Ke6 7.Kg5 Kf7 (7...Kd6 8.Kf6) 8.Kf5 is also reasonable. Kd4, however, is a powerful step into the center.


6...Ke6 7.Kc5


7...Ke7 8.Kd5
7...Kd7 8.Kd5 Ke7 9.Kc6 Ke6 10.Kc7 Ke7 (10...Kf6 11.Kd6) 11.Nc5 Kf6 12.Kd6 Kg5 13.Nd3


8...Kf6 9.Kd6
8...Kd7 9.Ke5 Kc7 10.Bd5 Black King won't make it to the h8-square.


9...Kf7 10.Ke5
9...Kg5? 10.Ke5 Kh6 11.Kf6 and Black is now forced to start his march to the hl-corner.


10...Kg7 11.Ke6
10...Ke7 11.Bd5!, Black again misses the h8-corner.


11...Kg8 12.Ne5
11...Kh6 12.Kf6


12...Kf8 13.Kf6
12...Kh8 13.Kf6 Kg8 14.Nf7 Kf8 15.Bh7
12...Kg7 13.Nf7 Kf8 14.Kf6 Kg8 15.Bd3 (Waiting move) Kf8 16.Bh7


13...Kg8 14.Nf7!
White denies Black's King the corner. This is the only way to win.
13...Ke8 14.Bd5 Kd8 (14...Kf8 15.Nd7+ Ke8 16.Ke6) 15.Ke6 Kc7 16.Nd7 Kc8 17.Kd6


14...Kf8 15.Bh7


The diagram shows a key position for which White has to aim - obviously it can also be rotated around the board through 90 degrees with Black King at h6 and White Knight and Bishop on g6 and g8 respectively. It does have to be memorized. One way of remembering this structure is to imagine it as a 'T' shape (and if you mix up the positions of Bishop and Knight then don;t worry because it means you have mated Black).
At the cost of misplacing his pieces, Black King is driven back toward the center and away from the wrong corner. Now White faces a difficult juggling act. On the one hand he has to keep Black King away from the h8-corner, and on the other hand he can't allow Black to slip out to the Queenside and make his way to the aI-square. White should be trying to play Nf7-e5-d7 as quickly as possible.

Phase 2: Driving the Black King along the edge into the correct corner.
This stage looks rather odd since it apparently involves letting the Black King escape. It's usually where players who haven't bothered to learn the winning process go wrong. And yet it isn't really difficult - the key to memorizing it is to remember that the Black King has to be driven away permanently from f8. Because this is dark square it means that a Knight has to do the job from a light square. Light squares on the seventh rank are important in this ending and having already used h7 and f7 in the diagram above, White need to switch his Knight as quickly as possible to d7. This explains his next move.

15...Ke8 16.Ne5!


16...Kd8 
This was a major decision point for Black. Usually by this stage in the ending he would have a sense of how confident White is of finding the winning method: if there has been any sign of hesitation then 16...Kd8 would certainly be the move to play since it requires most accuracy on White part. The alternative 16...Kf8 just gives White more time to organize himself: one simple way of forcing the Black King into the a8 corner is to repeat the 'T' shape two files to the left so that after transferring the Knight to d7 he plays Nd7-c5-b7.
16...Kf8 17.Nd7+ Ke8 18.Ke6 Kd8 19.Kd6 Ke8 (19...Kc8 20.Nc5 Kd8 21.Bg6 Kc8 22.Bf7 Kd8 23.Nb7+) 20.Bg6+ Kd8 21.Nc5 White is duplicating the manoeuvre he plays in main line in more favorable circumstances.


17.Ke6
Black King would escape after 22.Bf5 Kc7 23.Nd7 Kc6


17...Kc7 18.Nd7!
This is the part which requires strong nerves since carrying on with the Ne5-d7 plan appears to allow the Black King to escape. You might have the feeling that White has blown the win and that his quarry is about to escape. Not so!


18...Kc6 19.Bd3! Kc7 20.Be4
18...Kb7 19.Bd3
18...Kd8 19.Kd6


It is important to control c6 and force Black King even further back. 20.Bb5 is also possible but it's more logical to put the Bishop on the diagonal where it is going to deliver mate. 
20...Kd8 21. Kd6


21...Kc8 
21...Ke8 22.Bg6+ Kd8 23.Bf7 Kc8 24.Nc5

Phase 3: Delivering mate
This part is not completely trivial. Even when the Black King is cooped up in a light - squared corner it usually requires some thought to finish things off. The set-up to aim for from the above diagram is usually Kb6 and Nc5 with the Bishop on the c8-h3 diagonal preventing Black King from escaping via c8. If necessary White will make a waiting move followed by Na6+ and B# on the long diagonal. It is vital not to let the King escape since that could mean going back to phase 1 and, even with perfect play, not being able to mate within the 50-move rule.

22.Nc5


22...Kd8 
22...Kb8 23.Bf5 White would quickly reach b6 with his King and deliver mate.
23.Bc6! 
23.Bg6 Kc8 24.Bd3 Kd8 25.Ne6+ Kc8 26.Kc6 Kb8 27.Ba6


23...Kc8 24.Bd7+! Kb8 (24...Kd8 25.Nb7#) 25.Kc6 Ka7 26.Kc7 Ka8 27.Kb6 Kb8 28.Na6+ Ka8 29.Bc6#

Check my post on how t9 checkmate with two bishops here.

Jul 26, 2021

Basic Chess Ending 7 - Two Bishops

 There is no box strategy for mating with the two bishop. Instead, there are following principles at work:

  1. Use the Bishops to cut off two "connected" diagonals at the same time. This traps the defending King in one sector of the board.
  2. The Bishops will be able to take away other important squares while also making whole diagonals impassable.
  3. The player with the two Bishops must utilize his King more aggressively.
  4. Chase the defending King to a corner.
In Diagram, the starting position is as poor as it could be for the superior side. White will have to drive Black King to the side and eventually to one of the four corners.

White to move


1.Bd2


White Bishops control the el-a5 and fl-a6 diagonals. Black King can't pass through this "fence"—a fence White intends to shrink when the time is right.

1...Ke4 2.Ke2 Kd4 3.Kf3


3...Ke5 4.Be3

3...Kd5 4.Kf4 Kd4 5.Be2 Kd5 6.Be3


4...Kf5 
4...Kd5 5.Kf4

5.Bd3+ Ke5

5.Bg2 Ke5 6.Kg4 is also good.


6.Be4 Ke6 7.Bf4


The diagonal Box has shrunk. Now White controls hl-a8 and h2-b8.
7...Kf6 8.Kg4 Ke6 9.Kg5


9...Ke7 10.Kg6
9...Kd7 10.Kf6 


10...Kd7 11.Kf6
10...Ke6 11.Bf3 (Waiting move) 11...Ke7 12.Bg4 Once again shrinking the Box by laying claim to the h3-c8 diagonal.


11...Kd8 12.Ke6  Depriving black King of the d7-square.
11...Kc8 12.Ke6 Kd8 13.Bb7


12...Ke8 13.Bc7
The final phase: White takes away the d8-square and herds black's King towards the h8-corner.
12...Kc8 13.Bf3 (Waiting move) 13...Kd8 14.Bb7 Ke8 15.Bc7


13...Kf8 14.Kf6


14...Kg8
14...Ke8 15.Bc6+ Kf8 16.Bd6+ Kg8


15.Bd6 There goes the f8-square! 15...Kh8 16.Kg6 (16.Kf7?? stalemate would be disaster)
15.Bc6? Kh7 16.Bf4 Kg8 17.Be4 Kf8 18.Bg6 Kg8 19.Bd6 Kh8 20.Be4 Kg8 21.Kg6 Kh8 22.Bf5 Kg8 23.Be6+ Kh8 24.Be5#


16...Kg8 17.Bd5+ Kh8 18.Be5#

Check my post on how to checkmate with two knights here.

Jul 25, 2021

Basic Chess Ending 6 - Two Knights

 The odd case of two Knights vs. King is the most frustrating situation. The first thing that must be understood is that White only has a chance to deliver mate in this endgame if black's King willingly steps onto a corner square.


1...Kf8

1...Kh8?? 2.Nf7#


2.Nc6 Stalemate.
2.Nd7+ Ke7 and Black King flees away.

Check my post on how to check mate with lone Queen here.

Basic Chess Ending 5 - Lone Queen

 White cannot checkmate Black with the White Queen alone. White King must trek across the board and assist in the execution. Checkmate with a King and Queen can be accomplished only at the board edge. 


From diagram, White proceed with the endgame as follows:

1.Qb5 

With this move, White is trapping the Black King in a "box". The box method of checkmate is easiest, though slightly faster methods are also possible. The strategy here is to make the box smaller and smaller. After White Queen has trapped the Black King on the back rank, White King will march over and assist the Queen. 


1...Ke6 2.Qc5
1...Kc7 2.Qa6


White avoid playing 2.Qc6+, because a response of 2...Ke5 from Black would allow the Black King more room.

2...Kf6 3.Qd5
2...Kd7 3.Qb6


White does not lose track of his goals by uselessly checking his opponent. 
3...Kg6 4.Qe5 


4...Kf7 5.Qd6
4...Kh6 5.Qg3, thus trapping the Black King on the edge of the board. 


Now Black is trapped on the last two ranks.
5...Kg7 6.Qe6


6...Kh7 7.Qg4
6...Kf8 7.Qd7


Black King is trapped on the side of the board.
7...Kh6 8.Kb2 Kh7 9.Kc3 Kh8


10.Kd4 Kh7 11.Ke5 Kh8 12.Kf6 Kh7 13.Qg7#
10.Qg6?? Stalemate


Check my post on how to check mate with lone rook here.